


Tristy Lee- DIY | Home Decor | Art | Project Inspiration
Halloween DIY decorations have been some of our favorite projects. When I met Paul Emerson, I was so excited to find another husband and wife team who are as passionate about Halloween projects as us. A DIY giant Halloween spider has been on my list for years, and Paul’s is absolutely amazing. I was lucky enough to talk Paul into sharing the how-to for this project with us.
Patches the Spider Inspiration:
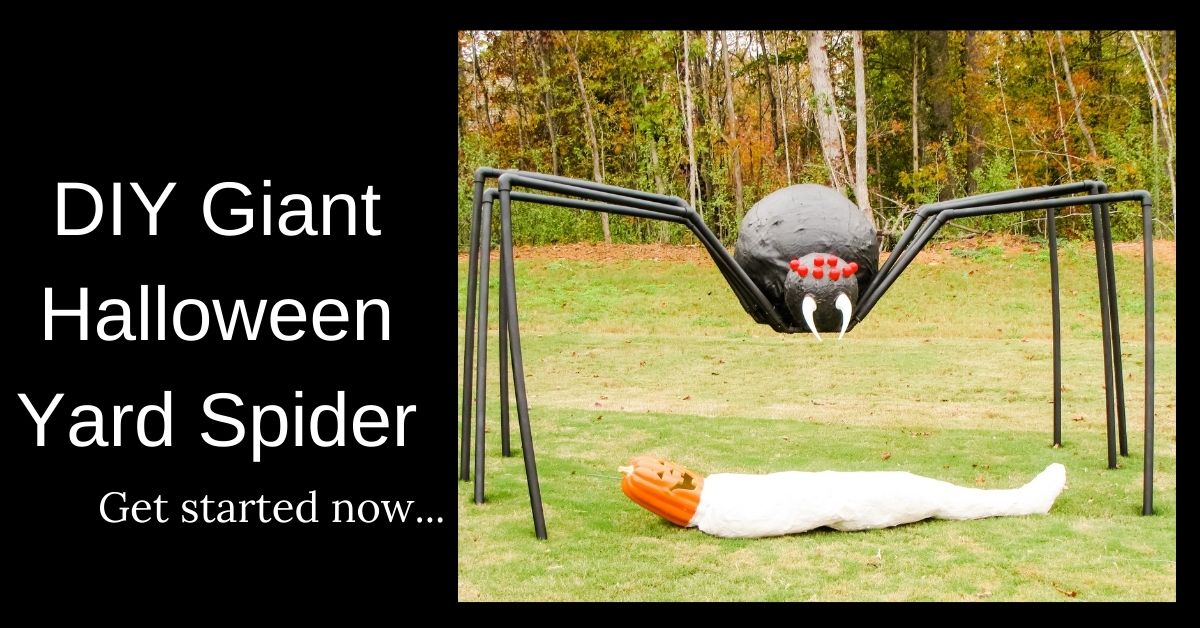
Halloween yard displays are a big thing in our house. My wife Tina and I decided that we wanted a giant free-standing spider to be one of the yard’s centerpieces. We started to research options, it quickly became apparent that sizable free-standing spiders are rare if they exist. The best we could find were things like trash bags you fill with leaves and examples of giant spiders tied to the house, but nothing that matched our vision. So we decided to figure out how to build our own, Throughout the next month Patches, the spider was born. She is about 6 feet tall at the top of her abdomen when she is standing up and about 11 feet wide from toe to toe. She has also been the centerpiece of our Halloween display since 2012. My wife and I had quite the adventure building her together..

DIY Supplies:
• 1”x6” board cut to length for base of body and place to secure legs
• 1- giant beach ball for the abdomen
• 1- large inflatable ball for the head
• 10- PVC pipes 1” with thick walls at 8’ each
• 8- 90 degree 1” PVC joints
• 8- 45 degree 1” PVC joints
• 8- 1” PVC Couplers
• 8- 1” to ½” PVC adapters
• 1- ½” PVC pipe with thick walls at 4’
• 8- 45 degree ½” PVC joints
• 8- Bolts
• 16- U brackets to secure the legs to the 1×6 board
• 4- 3’ rebar
• Multiple cans of Fiberglass resin with hardener
• Multiple sheets of FIberglass cloth
• Box of cheap 2-inch paint brushes
• 1- Can of Heavy Duty PVC glue
• 2- cans of black flat spray paint
• 1- Viking helmet where the horns can be removed
• 8- Bubble containers from gumball machines
Building the Spider Frame:
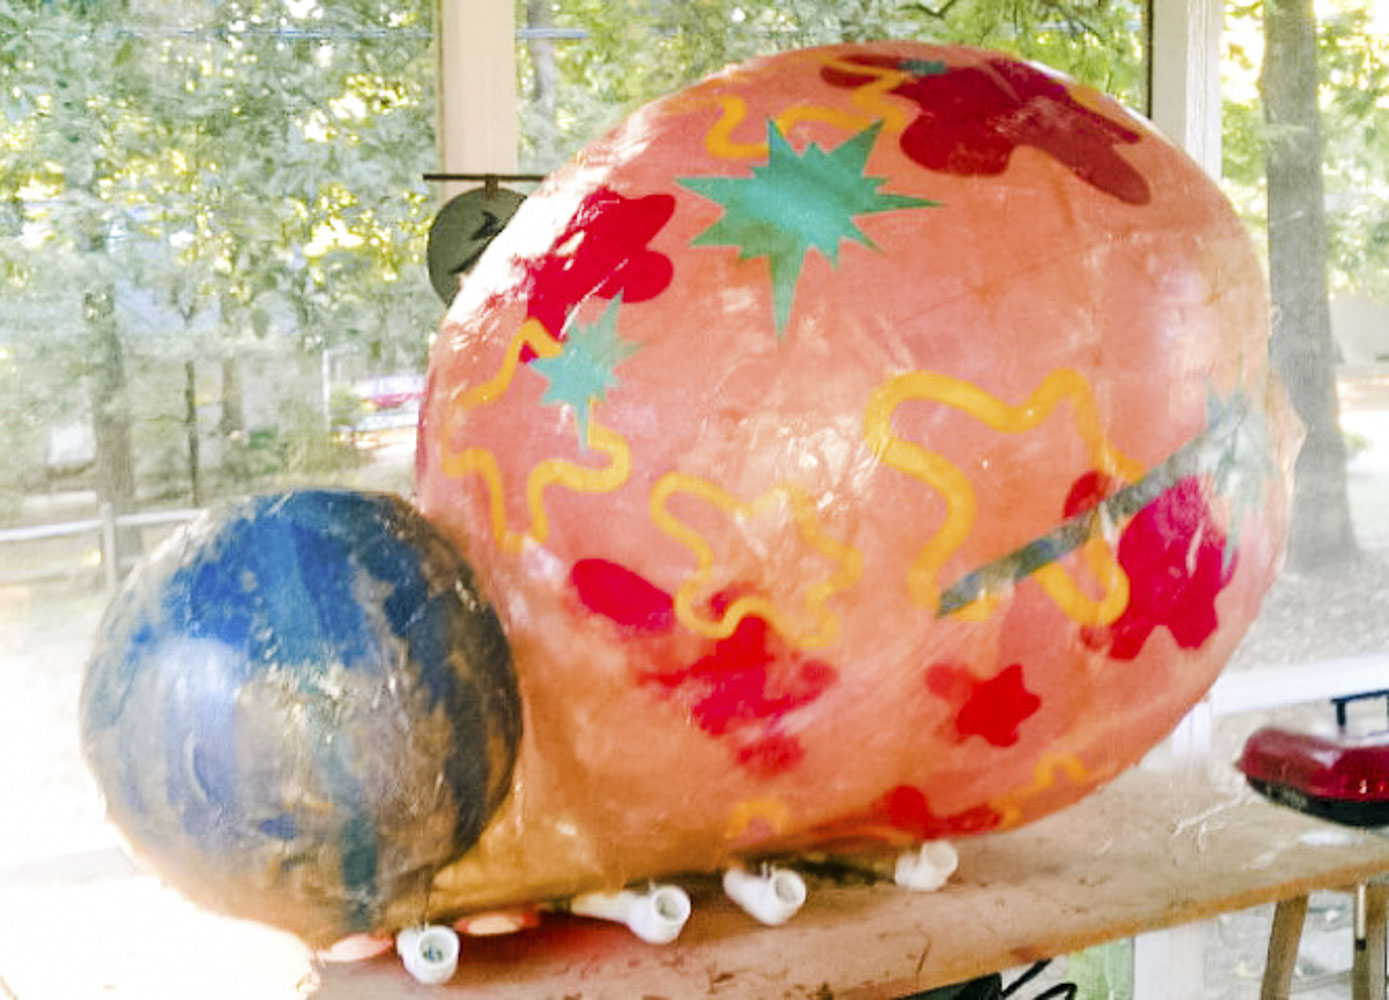
We started with a simple idea. We took a 1”x6″ board and screwed the PVC pipe and joints to its bottom. The PVC attached to the board is ½” PVC joints and pipe, and by using U brackets, they are all screwed into the board. We then flipped the board over and, using painter’s tape, secured 2 inflatable beach balls to the board’s top. The beach balls held the shape of the spider’s body.
Outdoor Décor Making it last:
Setting up the board, PVC pipe, and beach balls was the most challenging part of this exercise as we really wanted to make sure the body would not only support its own weight but look lifelike enough so that from either far away or up close people would know what it was. Once the body was perfect, we proceeded to put on a fiberglass resin layer over the entire body. Working with fiberglass and its resin is super simple . . . . IF you are prepared!
Steps to working with Fiberglass Resin:
1. We found the best way to work with this is to purchase several 1-quart plastic paint containers, a box of 2″ paint brushes that were super cheap and a ¼” dowel rod for stirring. The resin comes in two parts, the liquid resin and the hardener, and a chemical reaction when mixed together actually causes it to harden. It is relatively durable and lightweight when fully dry and will hold its own shape. To make it super strong and able to stay in one piece for years, you then start adding fiberglass cloth.
2. We started on the spider’s body with a layer of just hardened resin. We added some liquid resin into a paint container and then carefully count the number of drops of hardener that we put in. Once the first drop of hardener goes in, you are on basically a 5-minute clock! You have to get every drop of mixed resin that is in your paint container onto your subject because once it starts to harden, it will not spread. The mixed resin goes from liquid to gel then to hard, and once the mix hits gel form, it is hard to work with.
3. We would prep by getting the spider out on the driveway on a scrap piece of MDF wood, which acted as a table. We put it all on sawhorses, and the sawhorses were on a big plastic sheet to protect the driveway. We wore eye protection, gloves, and masks, as this stuff is definitely not found in the organic section. Once the spider was in position, and we had our safety gear on. We would measure out what we found to be the correct amount of liquid resin based on the instructions on the can and a bit of trial and error. Too much resin and it will harden before we get it on the spider. Not enough hardener and the liquid resin took forever to set. Perfect amount of liquid resin, but too much hardener, then it would harden before we got it all on the spider. We started with the instructions on the can and adapted as we went.
4. Once the spider was prepped, and the liquid resin was poured, that is when we would get our brushes in hand. Do one final check and then put it in the hardener. Mix with the dowel rod and start painting the mixed resin onto the spider. Once all of the mixed resin was applied, we would throw the paint brushes into a trash bag as they would also harden and become worthless and set the paint container that we used aside to dry. Grab another paint container; if it has been used, you can just mix a new batch on top of the hardened resin, or if you prefer you can peel it out of the plastic container. Rinse and repeat until the entire body, head to bottom and side to side, had a hardened resin layer. We would go from the top till we were three-quarters of the way down and then stop. Let it adequately cure over a day or two and then flip it over and apply resin until we reached where we ended.
5. Once the body has a full layer of hardened resin on it, then it is time to start using the fiberglass cloth to it. Everything remains the same in using mixed resin from before, but there is an added step to prep and when using the mixed resin. During prep, and while wearing gloves, you need to cut the fiberglass cloth into manageable pieces. Small enough to get fully covered in resin, but large enough so that you are not forced to stop applying resin to get another piece of cloth over and over. It is a race against time as the resin hardens, so the pieces need to be the right sizes to work with you and not against you.
One note on the fiberglass cloth is worth mentioning. This stuff will make a mess and try to get everywhere.
1. Always wear a mask, eye protection, and gloves when working with it.
2. Also, we had a plastic tub to hold the cloth. We would cut the fabric in the container as fiberglass threads will fall off and get everywhere, so containing those inside the tub kept the mess to a minimum.
3. We would open a cloth package, cut all of it inside the container into roughly the sized squares we were comfortable with, and just put the tub out next to the spider.
4. Once the cloth is cut to size, then apply the resin to the body, put a piece of fabric onto the still wet resin you just used, and put more resin onto the cloth until it is fully saturated.
5. Work on one cloth piece at a time. The next section should overlap maybe an inch or so, but it doesn’t have to be perfect, and you keep doing that until the entire body is covered in a layer of cloth and resin. This will give it good rigid strength.
6. Once the whole body is covered in the fabric, we put on another layer of resin on the entire thing and put small pieces of cloth in any spots we missed earlier.
DIY Lessons learned working with fiberglass–
Once you have all 3 layers, resin – cloth – resin, and they have hardened for a day or two, get a sander with a high grit on it and gently sand the whole thing. As the cloth set for us, threads would stick up and be very sharp. We got several cuts from Patches over the years as we had already finished her before figuring out this little issue.

Success Story: We are the Halloween House!
While we were applying the last layer of resin to the spider, we were interrupted by a mother and her 3 kids who must have been something like 9, 6, and 3. She came walking up the driveway very purposefully with the kids in tow and said, “You are the Halloween house, right?” Now we were right in the middle of applying the resin, and the clock was not our friend, so as nicely as we could, in between slopping resin onto the body, I said “well we put up stuff on Halloween so I guess . . . yeah?” She then proceeds to tell us that they were driving home and saw us out in the driveway working, and the kids immediately wanted to know what we were doing and if it was related to Halloween. So she pulled over and there they all were staring at us. The kids kind of hiding behind mom looking at us and whatever that thing was we were working on. There was a long pause as we finished applying the resin, and as soon as the last drop was on, I turned to them and let them know that yup we were working on a new thing for Halloween and that it was going to be a giant spider. That let loose a torrent of questions from the kids. “Spider? What kind of spider? How big is it? What will it look like? How are we making it? Will they be able to touch it?” So we spent probably 30 minutes standing in the driveway and talking all things Halloween. We told them what we were trying to do, and they loved it. They told us all about the previous Halloween and many a harrowing tale of their conquests. Even Odin sitting in the halls of Valhalla would be proud of their exploits!
Bringing Patches the spider to life:
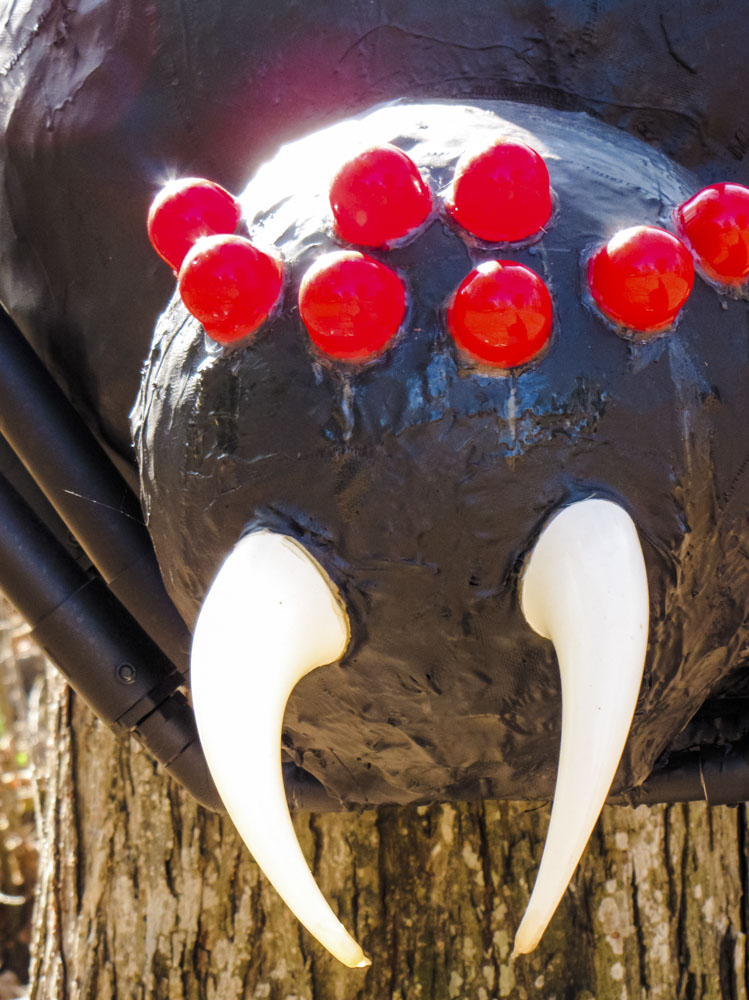
Back to building the spider. Once we had the resin part done, it was just time to add the features and paint it. We selected the containers from coin-operated machines where you put in like 50 cents to get a prize to create her eyes. We could care less for the prize as we wanted the plastic bubble they came in. We painted the inside of the bubbles red and then added resin to attach them into the face for the spider’s eight eyes. For the fangs, Minnesota fans don’t hate us. We took a Viking helmet and pulled the horns off, and resigned those onto the face. Once those were done, we painted the whole thing black, and the body was complete.
How to create spider legs:
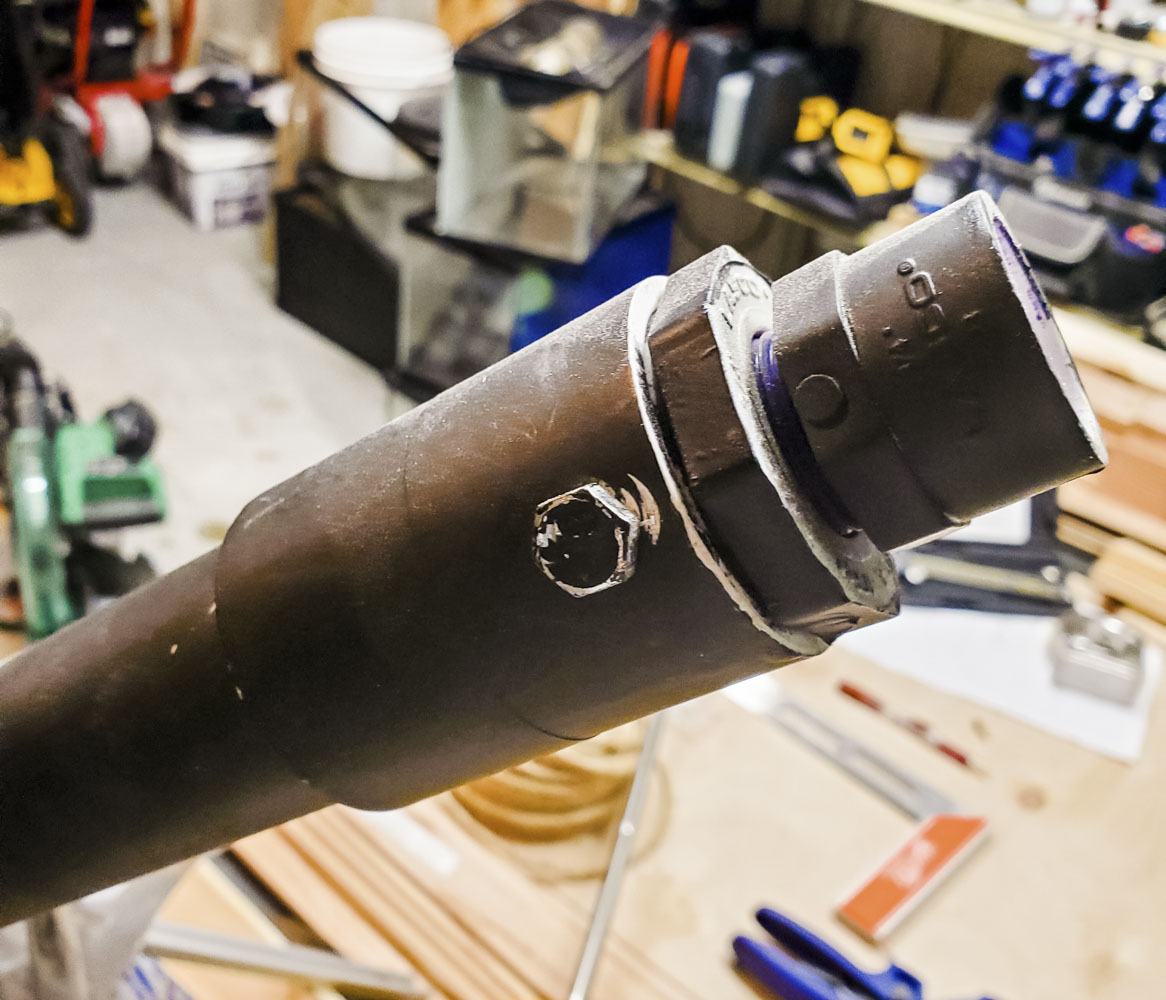
We then focused our attention back to the legs. Get the most durable PVC cement you can find, but be warned it sets in a few seconds once the pieces start touching. We had used ½” pipe on the bottom of the body attached to the board, but there is no way ½” pipe will hold the spider up, so we got adapters to transition the ½” pipe to 1″ pipe. There are basically two kinds of 1″ pipe at our big box store, ones with thin walls that would wobble a lot and didn’t seem sturdy enough. There is also 1″ pipe with a bit more thickness to the pipe walls, which seemed the best option. So we got enough 1″ pipe with the thick walls and adapters to convert the legs from ½” to 1″, rise 45 degrees from the body, bend 45 degrees to go straight over and then a 90 degree straight down. Cut the pipes to length, and we have a spider. The legs do come off the spider to store it during the other 11 months of the year. The adapter to convert from ½” to 1″ just slides into a coupling. This coupling is the only part of the legs we did not glue together. Once everything was assembled, and the legs were where we wanted them, we just drilled holes through the coupling and bolted through the hole. This secures the legs while the spider is standing and allows us to remove the legs for storage. Just make sure to mark each joint with a number and then number each leg with the same value. Write the number for the leg inside the foot. Caution, a couple of years of removing and attaching the legs causes the numbers to fade. You can see the joints with the bolt in action in.
Spider Yard Placement:
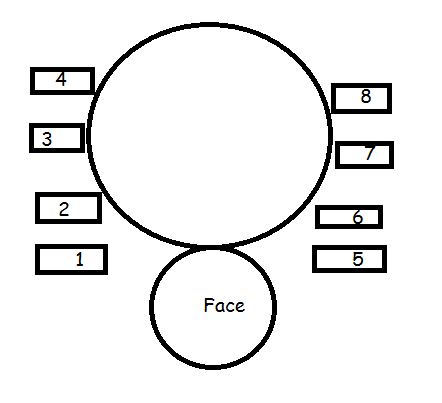
Patches can support her own weight and so can stand freely in the yard. The way we have learned to put her up is to wheel a trash can out into the yard. When the trash can is in the right place, we set her body onto the trash can. This keeps her body high enough so that we can attach the legs. Using a image below as a guide. Put on legs 1,5,4 and 8. Then put on legs 2,6,3 and 7. Let the legs naturally fall where they want to land. Once they are all in a position, go to leg 1 with a 3′ long piece of rebar. Hold the rebar, so it matches the angle of leg 1, where leg 1 touches the ground. Then just move leg 1 out of the way and hammer the rebar about 1 foot into the ground at the same angle that leg 1 wants to rest. Once the rebar is in, gently lift leg 1 until you can put it over the rebar, and it is done. Do this for legs 5, 4, and 8. We don’t put rebar under legs 2,3,6 and 7 as there is no need. We can remove the trash can that is holding the body up, and there you have it, a giant Halloween free-standing spider.
It’s a good thing that Patches the DIY Halloween Giant Spider lives in North Carolina because I really think she needs a friend here in UT. I’ll keep you posted on my campaign to convince Jet to give this one a try. Thank you Paul and Tina for sharing.
GET MORE LILIES AND JETS INSPIRATION:
Make sure you grab your Free Guide to Project Planning. We are always working on new DIY and Home Décor projects. Follow us on Instagram for previews and behind the scenes access to all things Lilies and Jets.

Paul Emerson and Tina Lane
Why do something simple when you can do it a billion times more complicated??? This is how you go through life so that you are never bored. From Halloween to fantasy football everything Paul and Tina do could be done so much easier, but it would never be as good.
We live just over the border from Charlotte NC. We have been married for 10 years after meeting while both of us worked in a grocery store. Tina still works in a grocery store as a meat cutter, and when our friends get out of line, she loves to remind them that she can get rid of them for $3.99 a pound. Paul works for Citi and descriptions of his job duties have been known to cause serious drowsiness so in case someone is reading this while operating a motor vehicle it is best to not discuss. We spend a lot of time doing DIY/crafts/construction projects and we never settle for the “it’s almost what we want but not quite”.


+ show Comments
- Hide Comments
add a comment