JOAN ATWOOD -ARTIST| EDUCATOR | CRAFTER | PROJECT INSPIRATION
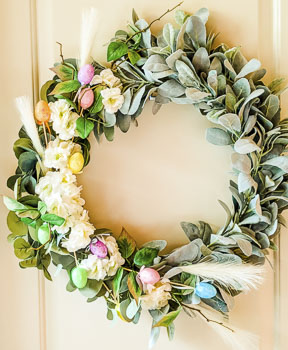
Getting inspiration for a new creation comes easily as we glide from one holiday to another. Many times, the stores have several holidays with decorations out at the same time. As I was wandering through the Dollar Tree, I got one of those aha moments. They had decorations out for Valentines, St. Patrick’s, and even a few Easter decorations. I got inspired with a notion to do a wreath that would function for two holidays: both St. Patrick’s Day and Easter. I grabbed a couple of packages of picks with shamrocks and another with Easter eggs. Why not DIY one wreath for two holidays?
Transitional Wreath Inspiration:
I let the idea marinate for about a week. When picking up a few groceries, I indulged myself by going down the crafting aisles at Walmart. I grabbed a wire wreath frame, some greens, a couple of white flowers, and a few odds and ends that had possibilities. (You never know how you will get inspired when you craft, so having several choices has served me well. Remember to think about items you already have when approaching new projects. It helps to build your craft supplies for spare of the moment crafting with others.)
So, once my husband was off golfing, I went to work, covered my table, and grabbed my supplies. The idea of using one wreath for two holidays in my mind. I knew that I needed to add more wire to the wreath base so I could easily add and remove items, but at the same time, I needed to secure the base greenery and flowers that were removable. I wrapped the wire around and around the base wreath frame. This provided just what I needed to secure the items I needed to stay in place yet allows me to add and take-out other items as needed.
Wreath Supplies:
- Dropcloth.
- Glue gun and sticks
- Wire wreath
- Wire and wire cutters
- Greenery
- Flowers (I stuck with white since I was going to add shamrocks for one holiday and eggs for another, which would add color)
- Shamrock and Egg picks
Video tutorial for creating your wreath:
Steps to create your wreath
- Cover your workspace.
- Heat your glue gun
- Cut apart the greenery and shorten the stems of all items and flowers for assembly.
- Wrap the wire around the wreath frame, making a weave of wire that I can use to push greenery and flowers through.
- Add greenery around the frame going in one direction until it is covered.
- Add flowers spacing them close, and add accent pieces where needed.
- Secure the greenery and flowers with additional wire and/or hot glue.
- Finally, poke the picks in for St. Patrick’s Day
- Store the egg picks for use after St. Patrick’s Day


Finalizing your Wreath:
Every time I do a craft, I learn something that will help me on the next one. This time I learned two things. The first thing I learned was that it takes more greenery than you think it will. Having leftovers is much better than having to go back to the store to get more supplies in the middle of a project. The next thing I learned was that it is easy to use one wreath for more than one holiday. I could add some mini flags and use the same wreath for the 4th of July. Win-win since storage is always an issue at my house. I noticed that there is always room for more Barry tools, but my stuff is another thing. I know, one man’s junk is another man’s treasure. There really is something to that saying. It was fun to think through and DIY one wreath for two holidays.
WANT MORE LILIES AND JETS:
See more projects on our Blog
Follow us on Instagram: Lilies and Jets


+ show Comments
- Hide Comments
add a comment